Leister Canada
  • Home
  • Equipment
    • All Equipment >
      • Air Heaters
      • Automatic Equipment
      • Blowers
      • Extrusion Welders
      • Hot Air Blowers
      • Hot Air Hand Tools
      • Testing Equipment
    • Flooring
    • Geomembrane
    • Industrial Fabrics
    • Manufacturing
    • Plastic Fabrication
    • Roofing & Decking
  • Services
    • Product Selection Help
    • Engineering Help
    • Installation Support
    • Product Training
    • Product Service
  • Resources
    • Articles
    • Case Studies
    • Engineering Information
    • Operating Manuals
    • Tech Tips
    • Whitepapers
  • About Us
  • Contact
    • Contact Us
    • Find a Distributor
  • Français

How to Change a Lock Pin on the VARIMAT, UNIROOF, or BITUMAT

4/24/2018

 
Many of Leister’s tools utilize a lock pin to hold the nozzle in position during welding and cooldown. The lock pin is designed to snap if excessive force is put on the heater in order to prevent more expensive damage to the tool.
​
The most common reason for a lock pin to bend or break is the tool being lifted or carried incorrectly. The correct methods of carrying the tool are with both hands under the frame, or with one hand under the frame and the other holding the black carrying handle.

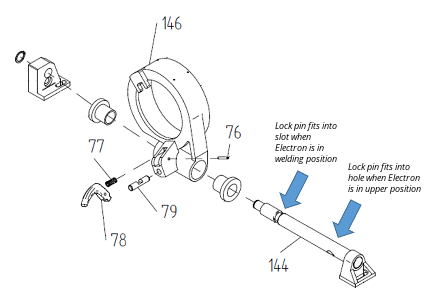
In this guide, parts will be referred to using the numbers indicated in the VARIMAT V drawing below. As an example, see lock pin (79).
VARIMAT Lock Pin Illustration
This is a simplified drawing.

Tools needed:

  • 3/32" punch and 1/4" punch
  • Hammer
  • 7/64" steel dowel (a 7/64” drill bit is a great substitute and is more commonly owned)
  • Long-nose vise grip

Tools which may be needed:

  • Type 7WR vise grip
  • Small flat screwdriver 

Method:

  1. Punch out the roll pin (76) with the 3/32" punch and hammer. Be careful not to hit the side of the trigger or the tool holder (146) with the punch. While keeping a finger on the spring (77) so that it does not fly away, hold the trigger (78) and pull out the punch. Pull out the trigger and the spring together.
  2. Remove the lock pin(79):
    1. If the lock pin is bent, pry it out with a vise grip.
    2. If the lock pin is broken and some of it is stuck in the hole:
      • Tip the tool so that the nozzle points upward as steeply as possible. Rock the heater up and down.
      • Pull at the broken piece of lock pin with the small flat screwdriver to draw it out. 
        ​If you are unable to remove the entire lock pin please send the tool in for repair at STANMECH.
  3. Install the new lock pin with the flat middle section facing where the trigger will be.
    1. For the UNIROOF AT or ST the flat section is off-center. The new lock pin must be installed with the flat section closer to the trigger.
  4. Install the spring and trigger together:
    1. Ensure that the trigger fits into the flat section of the lock pin, and that the hole in the trigger is in line with the holes in the tool holder.
    2. Hold the trigger in place and feed your dowel (or the blunt end of your drill bit) through the lower hole in the tool holder, through the trigger, and partway through the upper hole in the tool holder. This will keep the trigger in place and aligned while you re-insert the roll pin.
    3. Hold the roll pin with the clamped vise grips with very light pressure so that the roll pin is not crushed. This works best if the vise grips are positioned a third of the way up the roll pin.
    4. Feed the roll pin into the upper hole of the tool holder while twisting it back and forth with the vise grip. Adjust the vise grip as necessary. It can also be helpful to make slight positional adjustments with the trigger during this process, to reduce resistance on the roll pin.
    5. If the roll pin stops making forward progress, tap it gently with the hammer. Be careful not to hammer the roll pin against the side of the trigger or tool holder (on the inside). It can help to press forward on the trigger while tapping the roll pin.
    6. When the roll pin is so far in that the vise grip cannot grip it, carefully tap the roll pin with the hammer until the roll pin is completely inserted.

Bonus: How the Lock Pin Works

​The heater with nozzle fits into the tool holder (146). To move the nozzle from the upper position to the weld position, squeeze the trigger (78) which swivels on roll pin (76), pulls on the lock pin (79) and pushes on the spring (77). Then drop the nozzle down, tuck it under the drive tire and release the trigger. The spring pushes the trigger down and the trigger pushes the lock pin forward into the slot in the guide shaft (144). 

Comments are closed.
STANMECH Technologies Inc. 
944 Zelco Drive Burlington ON L7L 4Y3 | 1-888-438-6324 | 
info@stanmech.com
Terms of Use    Privacy    Terms and Conditions of Sale   Warranty Policy
Français

Proud Member of:
Picture
Industrial Fabrics Association International
Picture
International Association of Geosynthetic Installers
Picture
​Authorized by the Association of Professional Engineers of Ontario to offer professional engineering services. 
  • Home
  • Equipment
    • All Equipment >
      • Air Heaters
      • Automatic Equipment
      • Blowers
      • Extrusion Welders
      • Hot Air Blowers
      • Hot Air Hand Tools
      • Testing Equipment
    • Flooring
    • Geomembrane
    • Industrial Fabrics
    • Manufacturing
    • Plastic Fabrication
    • Roofing & Decking
  • Services
    • Product Selection Help
    • Engineering Help
    • Installation Support
    • Product Training
    • Product Service
  • Resources
    • Articles
    • Case Studies
    • Engineering Information
    • Operating Manuals
    • Tech Tips
    • Whitepapers
  • About Us
  • Contact
    • Contact Us
    • Find a Distributor
  • Français